Pairing your Apple AirPods, AirPods Pro, or AirPods Max with your Windows PC is as simple as pairing any other Bluetooth-enabled device. You will be able to connect Airpods to windows PC in some easy steps. After that, you may use your AirPods to listen to music and make internet calls on your laptop.
You can pair and use your AirPods with any Bluetooth-enabled device, including an Apple iPhone, iPad, Mac, and even an Android phone. Your AirPods function similarly to any other Bluetooth earbuds.
Connect AirPods to Windows 10 or Windows 11 Laptop
To begin the pairing process,
- Press Windows+i on your Windows 10 or 11 laptops to enter Settings.
- If you’re using Windows 10, go to Settings > Devices > Bluetooth & Other Devices.
- Select “Bluetooth & Devices” from the left sidebar in Windows 11.

- Turn on the “Bluetooth” toggle in the right-hand pane if it isn’t already. This turns on Bluetooth on your laptop.
- Then, at the top of your page, click “Add Bluetooth or Other Device” (Windows 10) or “Add Device” (Windows 11).

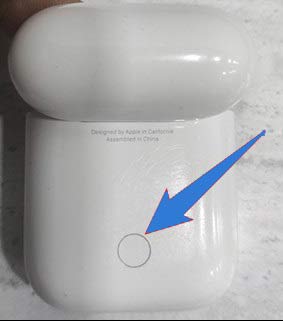
- Place both AirPods in their charging case and leave the lid open to make your AirPods or AirPods Pro discoverable.
- Press and hold the Setup button on the back of the casing for about eight seconds. The AirPods’ charging light will ultimately start pulsating white indicating the AirPods are ready to pair. When this occurs, lift your finger and return to the Add a device option.

- If you have AirPods Max, press and hold the noise control button for five seconds instead. If you’re pairing an AirPods Max headset, the status light will flash white.
- The AirPods will appear in the “Add a Device” window on your laptop. Select your AirPods.
- After pairing with your AirPods, the laptop will display a success message. Click “Done” at the bottom to close the “Add a Device” window.
The AirPods are now connected to your laptop, and you can use them to listen to the audio as well as talk on online calls.
How to disconnect AirPods from Windows 10 PC
Unpairing your AirPods permanently is a similar process as reconnecting them, with one exception.
- Launch the Settings app.
- Press devices
- Choose your AirPods in the Audio section by scrolling down.
- When a prompt appears, select Remove device.
How to disconnect AirPods from Windows 11 PC
You’ll follow the same procedures as when reconnecting your AirPods to remove them as a device.
- Launch the Settings app.
- select Bluetooth & devices option.
- Find the large AirPods button (such as “AirPods Pro”) on your device.
- In the button’s upper-right corner, click the vertical row of three dots.
- Select Remove device from the tiny pop-up window that displays.
- Click View additional devices directly below the buttons on this screen if you can’t find your AirPods there. Scroll down to Audio after that.
- Click on the vertical row of three dots on the AirPods entry.
- Select Remove device.


