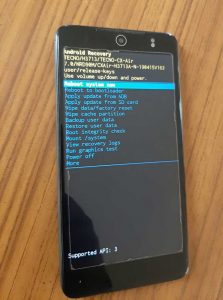
Android-powered smartphones are undoubtedly the most popular in the world today, much praise to its open-source policy. These smartphones come with a hidden recovery mode that is designed to help a user recover the device when things go wrong, it can also help you tweak a number of options on the phone. It is expected that you are an expert to use this mode, however, if you follow this article you will find it easy using it. But first, let’s talk about how to get into the recovery mode.
Irrespective of how and why you want to use the recovery mode, here’s how you get into the mode and what you can do with each option available in there.
Using Key Combinations
The easiest and probably the most popular method is to use a dedicated key combination to force your device to boot into the recovery mode. Interestingly each Android device has a key combination that, when pressed, allows your device to reboot into recovery mode.
On most Android devices, the key combination for the recovery mode is:
Volume Up + Power Button
or
Volume Down + Power Button
Keep these keys pressed for about 5-10 sec and release them when the phone boots.
At this point you should be in the recovery mode, however, sometimes you may find that the screen only displays an Android logo with the message ‘No Command’. Do not panic, just press the volume up/down key + power button again for about 2 seconds and release, do not let it restart. This brings up the recovery mode.

Remember that your device must be turned off before you use these key combinations.
You might also like: How to Find Your Lost Android Phone
Using Android Debug Bridge (ADB)
This method is a little advanced. ADB has a number of commands to perform various actions on your Android device and one of these commands lets you reboot into recovery mode.
Provided you have the ADB toolkit set up on your machine, the following is what you need to do to enter recovery mode.
Head to Settings > Developer options on your Android device and enable the USB debugging option.
Note here that the developer option is not readily available in the list of settings again on more recent Android devices. To enable this,
Head to settings > about device > then tap the build number seven times to enable the developer option.
Go back to settings and developer option will now be listed.
Plug in your device to your computer and launch a Command Prompt or Terminal window in the ADB folder. Type in the following command and press Enter.
./adb devices (for Mac)
adb devices (for Windows)
This will bring your device to the list. Next, type in the following command and press Enter.
./adb boot recovery (for Mac)
adb boot recovery (for Windows)
Your device will immediately turn off and reboot into the Android recovery mode.
How To Use the Android’s Recovery Mode Options
Now that you are in the recovery mode, things might look a little strange especially if this is your first time. However relax, almost all the options you see listed there are self-explanatory, nonetheless let’s go through each their functionality to put you at ease. That way you’ll know when to use what option.
- Install from internal storage – this allows you to install a zip file from the internal storage of your device. It’s usually used when you have downloaded a recovery flashable file from the Internet and you wish to flash it on your device. Mostly used to fix a problem or further customize your device.
- Install from ADB – this option lets you use the ADB toolkit in the recovery mode on your device. You can add, modify, and remove stuff using ADB with this option. You have to be connected to your computer to use this.
- Wipe data and cache – as the name implies, it lets you clear data as well as cache files from your device. This comes handy when you notice any funny behavior on your device. It has three sub-options:
- Reset system setting – this lets you reset your device to the factory settings. You get your device settings back to how it was when you got it.
- Wipe cache – this option erases all the cache files from your device, leaving the cache memory as clean as new
- Erase everything – use this if you’d like to delete everything on your device. Mostly used of your phone runs into a serious problem and restoring settings or wiping the cache wouldn’t just do. This starts your phone afresh like when you got it with no files on it.
- Advanced – this has two sub-options in it:
- Reboot to fast-boot – it reboots the device into fast-boot mode. It’s a mode just like recovery mode but allows you to flash custom files using ADB and fast-boot.
- Reboot to recovery – it reboots your device into the recovery mode.
The recovery mode is no doubt a powerful hidden feature that lets you unleash the true power of your Android device and get your device back to optimal functionality when it runs into trouble. It might feel strange and scary using it for the first time, however, once you’ve got used to it, you will find it easy fixing any android device.


